
Those who know the 25 bus don't need to be told how packed, off-schedule and chaotic that route can get. As the bus approached the stop, I looked and saw that it was jam packed. The girl, her mother and I quickly had a verbal plan about how to board the bus. I was going to take the forward-facing spot while she would take the backwards-facing spot. It seemed simple enough.
Of course, it was the 25 bus.
What happened afterwards could only be described as absolute chaos. I knew exactly what to do and where to go. The other passengers, however, didn't. Words can not describe how frustrating it was to repeat, "I need those seats over there" while other people just stood there and stared and the people in the seats I was pointing to were just looked around as if I was talking to somebody else.
It was stupid that it took so long to get the bus going that day. But before you think, "Of course it will take forever; wheelchair passengers always take forever!", consider this: it usually takes me an average of 15 seconds to board and be ready to go. (I'm a speed freak despite my limited walking ability.) With that kind of speed, I doubt that I was the problem. The problem was that other people had no idea how or where to vacate for wheelchair passengers.
I guess I couldn't blame them completely. After all, each bus is different. Perhaps that was part of the problem. So, without further adieu, I bring you the return of my "craptastic art" with this new informational post about the different types of buses/vehicles and which spots exactly to vacate when needed.
(All photos courtesy of BuckyHermit at Flickr.)
---
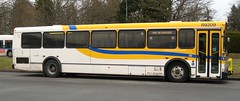
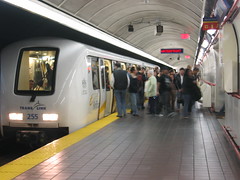
New Flyer D40LF, D60LF, C40LFR (some)
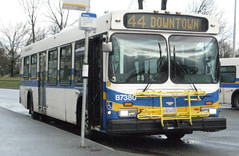
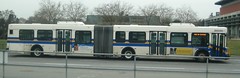

The D40LF and D60LF buses (top two photos) are most common for routes operating out of Burnaby, Surrey and Richmond (as well as C40LFR, bottom photo, out of the Tri-Cities). These are the most familiar to people because the layout is very simple.

In the drawing:
-seats labeled #1 and #2: flip them up!
-restraint belts located below seats labeled #2.
-therefore: vacate if you are in seats #1 or #2.
---
New Flyer E40LFR, E60LFR, D60LFR; Nova Bus
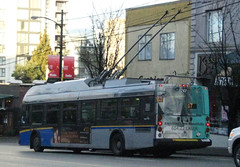
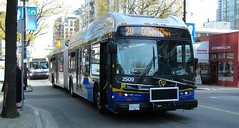
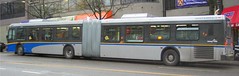
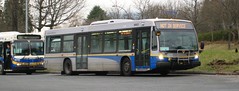
This is where some confusion occurs. The E40LFR and E60LFR buses (top 2 photos) are trolleys; the D60LFR buses are the new articulated buses (third photo from top); and the Nova Bus has the large front windows and wide front doors (bottom photo). The trick here is that the first wheelchair is behind the driver and faces backwards; the second wheelchair faces the front. Here is how it works.

In the drawing:
-seats labeled #1 and #2: if there is no wheelchair in this space, flip these seats up!
-first wheelchair parks at #1; #2 can be flipped back down if space allows it.
-seats labeled #3: if the spot at #1 is already occupied by a wheelchair, flip up all #3 seats.
-restraint belts are below the forward-facing #3 seats -- so all #3 seats MUST be vacated if a second wheelchair comes on!
-therefore: vacate if you are in seats #1; seats #2 may or may not need to be vacated (it depends on space).
-therefore: if #1 is already occupied, vacate seats #3.
---
Orion V
These buses run mostly from Bridgeport Station to Delta, White Rock and South Surrey. There are a few complications here: Orion V buses use lifts instead of ramps and they only have one door. However, the process here is quite straightforward.

In the drawing:
-#1 and #2 seats must be flipped up. Obviously, only one side is needed per wheelchair.
-restraints are below #1 seats and a lap belt is next to #2 seats.
-therefore: vacate #1 and #2 when needed.
---
Community shuttles
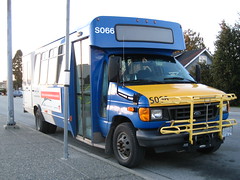
Community shuttles are kind of annoying. The only way for wheelchair users to enter is through a back door. In addition, it uses a lift that requires the driver to exit the vehicle to operate. Lastly, it requires straps and hooks that take forever to set up. Needless to say, these are not my favorite vehicles on the fleet. But nonetheless, they are still necessary.

In the drawing:
-flip up seats #1. These are finicky seats and the driver may need to assist.
-therefore: vacate seats #1.
---
Bus stops

In the drawing:
-accessible bus stops are marked with a wheelchair symbol.
-therefore: allow passengers with disabilities to board first. Simple.
---
SkyTrain: MK1

These SkyTrains are the old ones that first went into operation in the 1980s. They are often associated with the Expo Line but operate on both the Expo and Millennium Lines.

In the drawing:
-there are flip-up seats (#1 and #2) beside the doors. They should automatically flip up when you stand up.
-therefore: vacate seats at #1 or #2 when needed.
---
SkyTrain: MK2
These SkyTrains are the newer ones that went into operation in the late 1990s with similar ones coming in during the 2000s. They are often associated with the Millennium Line but operate on both the Expo and Millennium Lines.

In the drawing:
-flip-up seats are at #1 and #2. However, they are not immediately obvious; look for signs.
-#1 and #2 seats can be flipped up like bus seats.
-therefore: vacate seats #1 or #2 when needed.
---
SkyTrain: Canada Line

The Canada Line trains run exclusively on the Canada Line and have a more spacious inside layout. It is immediately obvious where the designated bike and wheelchair bays are.

In the drawing:
-wheelchair spots are at #1 and bicycle spots are at #2.
-therefore: vacate #1 when needed; #2 is often not needed for wheelchairs but it is still possible.
---
SkyTrain: doors

In the drawing:
-accessible seating is often located near doors with the wheelchair symbol.
-therefore: when boarding, be aware that passengers with disabilities are likely to use this door.
---
SeaBus
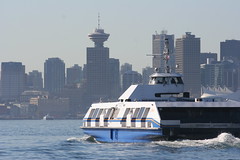
The Seabus connects downtown Vancouver to North Vancouver. There are no flip-up or movable seats to enhance accessibility, so things are a bit different here as well.

In the drawing:
-accessible seating #1 is often at the second door from the front or back of the ferry.
-the seating will always be next to the entrance or exit.
-therefore: if the space is needed, do not clog this area with luggage.

In the drawing:
-SeaBus doors have wheelchair symbols to indicate where the accessible spaces will be located.
therefore: when using these doors, be aware that there may be passengers with disabilities using the same doors to get on (and the same doors at the opposite end to get off).
---
Whew!
That is a lot to cover. I hope it was not overly detailed. So the next time you are wondering if you should vacate your seats or spots, there will be less confusion.
If you are still unsure, pay attention to what the passenger using the wheelchair or the driver is telling you. All of us want to get moving as efficiently as possible!


I could make some nicer graphics for you in Photoshop if you wanted and you could swap them into the article.
ReplyDeleteI've used Photoshop since my teens. :) I had some interesting (and positive) comments about the craptastic art, which is why I decided to keep them.
ReplyDeleteI like the craptastic art!
ReplyDeleteReally great blog post, very helpful. I agree that a lot of the delays with boarding wheelchairs are due to the other passengers who refuse to move (so annoying!). If only more people were to read and follow this advice, it would make our commutes faster.
It's even worse when people refuse to move without realizing WHY they have to move. They don't realize that a wheelchair that is not secured properly (either forward facing with restraints or in one of those backwards-facing slots) can slide along the floor when the bus accelerates, brakes or turns. Obviously this is unsafe; for some reason, many people don't understand this.
ReplyDelete